
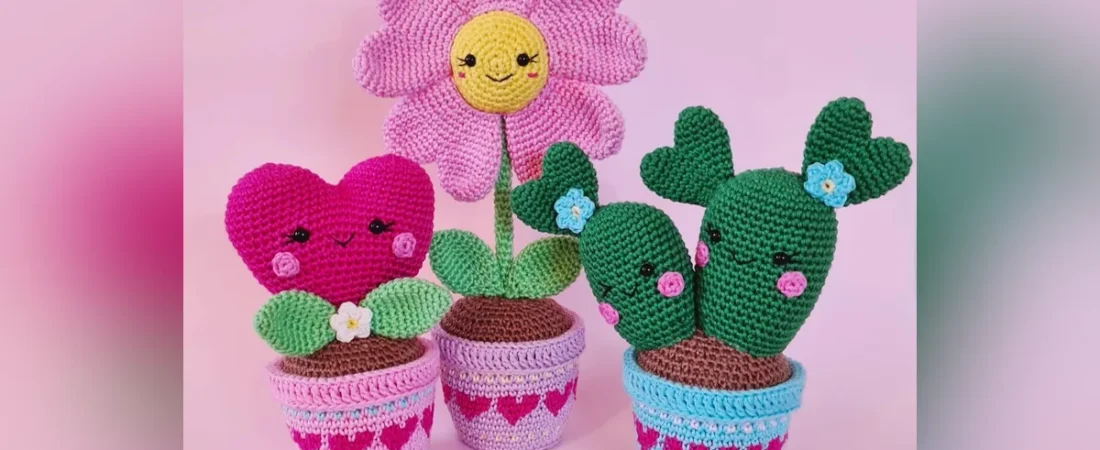
A crochet plant that never needs watering is a cheerful way to brighten a shelf or handmade gift display. These free crochet plant patterns include three different potted designs: a smiling pink heart plant, a tall daisy-style flower with heart-shaped petals, and a pair of friendly green cacti. All three use the same crocheted pot and brown soil base, so once you understand that construction, you can put your attention into the details of each plant.
The tutorial below provides the entire pattern for all three designs, including the pot, flowers, cactus pieces, faces, and finishing. Work with the written stitch counts beside you, especially when joining two rounded pieces to form a heart. The original design is credited to Jennifer Santos / Super Cute Design; this English-language tutorial is prepared for HookLoopPatterns from the supplied pattern files.
Pattern Overview
| Detail | Description |
|---|---|
| What you’ll make | Three stuffed crochet plant decorations: a heart plant, a daisy-style flower, and twin cacti |
| Pattern format | Complete free written instructions for all three; shared pot made separately for each |
| Skill level | Confident beginner to intermediate (editorial assessment based on spiral shaping, colorwork, joining, and sewing) |
| Crochet terms | US terminology |
| Construction | Continuous-spiral amigurumi, separate small components, embroidered faces, and sewn assembly |
| Yarn | Scheepjes Catona used in the original; cotton yarn in the color palette below |
| Hook | 2.50 mm, or an appropriate size for your chosen yarn |
| Finished measurements in source | Heart plant: approximately 15 × 10 cm; twin cactus: 18 × 15 cm; tall flower: 27 × 13 cm. The source does not label the order of height versus width. |
| Gauge | Not supplied; no substitute gauge has been invented |
| Techniques | Magic ring, increases, decreases, back/front loops, two-piece joining, color changes, treble-crochet rim, facial embroidery |
The stated measurements come from the original pattern and may vary with your yarn, hook, and tension. If you are making all three plants, you will need three complete pots and three soil inserts.
Materials and Tools
- Scheepjes Catona yarn or suitable cotton yarn in the colors used by your chosen design. The original sample lists Pink #222, Yellow #280, Purple #226, Blue #397, Green #513, Dark Green #515, Hot Pink #114, and Brown #157. Use the colors as visual references rather than a fixed quantity list; yardage and total weight were not specified.
- 2.50 mm crochet hook, adjusted if needed for your yarn so stuffing will not show through the fabric.
- Tapestry or yarn needle and scissors.
- Polyester fiberfill stuffing.
- 6 mm and 7 mm safety eyes, according to the component instructions.
- Black embroidery floss for eyes, lashes, and smiles; pink embroidery thread for the flower-bud cheek details. Optional white sewing thread is mentioned for attaching the tall flower head.
- Locking stitch marker.
- Small piece of cardboard to reinforce each pot bottom.
- A wooden flower stick for the tall flower stalk.
- Pins or removable clips to position the pieces for sewing (supplementary assembly aid).
Safety note: Safety eyes and the wooden stick make these projects unsuitable as toys for babies or young children. These instructions describe decorative plants, not child-safe play items. Keep pointed wood ends and small parts inaccessible; choose embroidered eyes if making an item for a setting where loose parts could be hazardous. Cardboard is also unsuitable for washing.
US Crochet Abbreviations
| Abbreviation | Meaning |
|---|---|
| MR | Magic ring |
| ch | Chain |
| sc | Single crochet |
| dc | Double crochet |
| tr | Treble crochet |
| sl st | Slip stitch |
| inc | Increase: work 2 sc into the same stitch |
| dec | Decrease: single crochet 2 stitches together (sc2tog) |
| st / sts | Stitch / stitches |
| R / rnd | Round |
| BLO | Back loops only |
| FLO | Front loops only |
| [ … ] × 6 | Repeat the stitches inside the brackets six times |
The original pattern sometimes abbreviates a slip stitch as sl; this tutorial consistently writes sl st. A double crochet appears in the small decorative flowers even though it is absent from the original pattern’s short abbreviation list.
Important Pattern Notes
- Work in continuous spirals unless the pot edging or tiny decorative flower explicitly says otherwise. Do not join every round; place a stitch marker in the first stitch and move it up as you work.
- Finished round counts appear in parentheses. A sequence such as
2 sc, inc, [4 sc, inc] × 5, 2 schas deliberately staggered increases. Do not omit the stitches before or after the repeats. - For each pot, Color A means the main pot shade, Color B the contrast stripe, and Color C the heart accent. The original photographs show pink/purple accents on one pot and blue contrasts on another; choose your own combination while preserving the stitch sequences.
- Change colors on the final yarn-over of the preceding stitch. That keeps the next stitch in the intended color. In the pot heart band, stitch counts stay constant while the colors change.
- Save the specified loops: pot R24 is worked in front loops only, leaving its back loops for the soil. The decorative edging is worked later from the upper rim.
- When two rounded tops form a heart, work around Top 1 and then around Top 2 to make one continuous circumference. Do not work through both layers as though you were sewing the pieces flat. Use the saved tail to close the small center gap.
- Do not insert eye backs until the embroidery around the eyes is complete. Follow each component’s specified round and spacing before stuffing closes the opening.
Complete Free Crochet Plant Patterns: 3 Easy-to-Follow Designs
Part 1: Make the Shared Crochet Pot (Make 1 per Plant)
The pot starts as a flat circle, turns upward into a wall, gains a heart-patterned colorwork band, and ends with a folded rim. Make it once for the heart plant, once for the tall flower, and once for the twin cactus if you want the complete set.
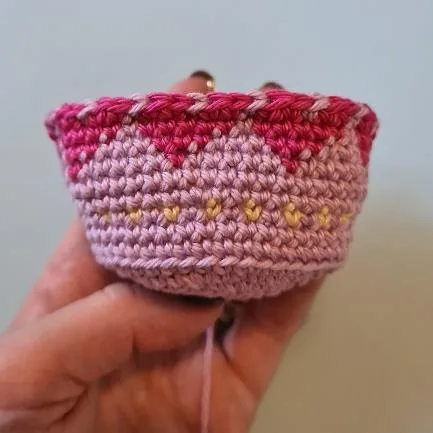
With Color A, make an MR.
- R1: 6 sc in MR. (6)
- R2: Inc in each stitch around. (12)
- R3: [1 sc, 1 inc] × 6. (18)
- R4: 1 sc, 1 inc, [2 sc, 1 inc] × 5, 1 sc. (24)
- R5: [3 sc, 1 inc] × 6. (30)
- R6: 2 sc, 1 inc, [4 sc, 1 inc] × 5, 2 sc. (36)
- R7: [5 sc, 1 inc] × 6. (42)
- R8: 3 sc, 1 inc, [6 sc, 1 inc] × 5, 3 sc. (48)
- R9: In BLO, 48 sc. (48)
- R10: 48 sc. (48)
- R11: [1 sc in B, 1 sc in A] around. (48)
- R12: With A, [7 sc, 1 inc] × 6. (54)
- R13: With A, 54 sc. (54)
- R14: 3 sc in A, 1 sc in C, then [5 sc in A, 1 sc in C] × 8, finishing with 2 sc in A. (54)
- R15: 2 sc in A, 3 sc in C, then [3 sc in A, 3 sc in C] × 8, finishing with 1 sc in A. (54)
- R16: [1 sc in A, 5 sc in C] × 9. (54)
- R17: [1 sc in A, 2 sc in C, 1 sc in A, 2 sc in C] × 9. (54)
- R18: With A, 54 sc. (54)
- R19: 4 sc, 1 inc, [8 sc, 1 inc] × 5, 4 sc. (60)
- R20: [1 sc in B, 1 sc in A] around. (60)
- R21–R23: With A, 60 sc per round for 3 rounds. (60 each)
- R24: In FLO, 60 sc. (60)
- R25: 60 sc, then make 1 sl st. (60 sc)
Make the folded upper rim: Turn the pot so its opening faces you. For R26, work in the upper rim’s back loops: ch 3, then 1 tr in each stitch around; finish with 1 sl st. Fold the edging down over the outside wall and secure the yarn ends. If needed, tidy the color transitions in the heart band with a few small stitches.
Rim clarification: The supplied pattern does not explicitly say whether the starting ch 3 counts as a treble crochet, or state an independent stitch total for R26. Those details are deliberately not invented here. Work the treble edging as written in your source while keeping the folded rim even, and use the photographs to identify its placement.
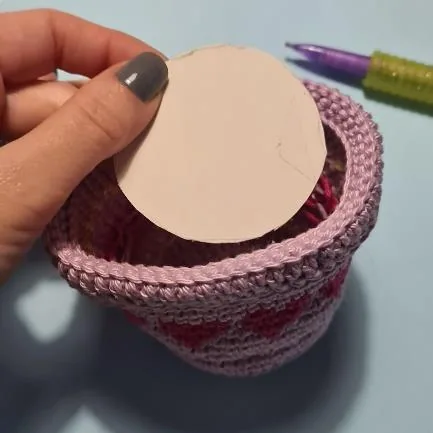
Trace the base on cardboard, cut out a matching circle, and place it inside the bottom to stabilize the pot before filling it.
Crochet the Brown Soil Insert
The soil is crocheted directly into the unused back loops of pot R24—not the back loops used for the upper decorative edging. With brown yarn, attach at these reserved loops and work:
- Soil R1: 4 sc, 1 dec, [8 sc, 1 dec] × 5, 4 sc. (54)
- Soil R2: [7 sc, 1 dec] × 6. (48)
- Soil R3: 3 sc, 1 dec, [6 sc, 1 dec] × 5, 3 sc. (42)
- Soil R4: [5 sc, 1 dec] × 6. (36)
- Soil R5: 2 sc, 1 dec, [4 sc, 1 dec] × 5, 2 sc. (30)
- Soil R6: [3 sc, 1 dec] × 6. (24)
- Soil R7: 1 sc, 1 dec, [2 sc, 1 dec] × 5, 1 sc. (18)
- Soil R8: [1 sc, 1 dec] × 6. (12)
- Soil R9: Dec × 6. (6)
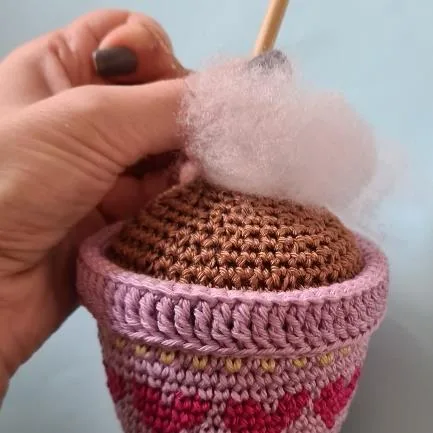
Begin stuffing after Soil R5, adding more fiberfill as the hole gets smaller. After Soil R9, use the yarn tail to sew the remaining opening closed and fasten off. The top should look like a rounded brown soil mound. Repeat the entire pot-and-soil procedure for each additional plant.
Part 2: Daisy-Style Crochet Flower in a Pot
This flower has a yellow embroidered face, five pink heart-shaped petals, a narrow green stalk, and two green leaves. Make one complete pot with soil before beginning assembly.
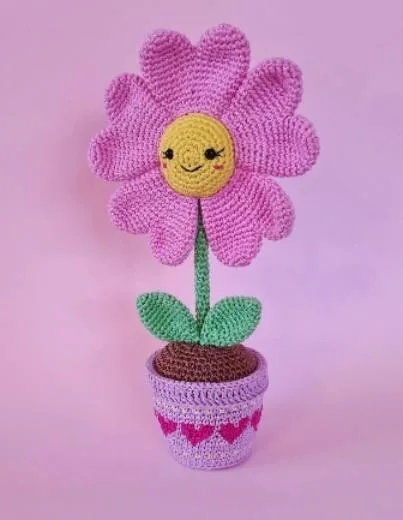
Make the Yellow Flower Bud (1)
With yellow yarn, make an MR.
- R1: 6 sc in MR. (6)
- R2: Inc × 6. (12)
- R3: [1 sc, 1 inc] × 6. (18)
- R4: 1 sc, 1 inc, [2 sc, 1 inc] × 5, 1 sc. (24)
- R5: [3 sc, 1 inc] × 6. (30)
- R6: 2 sc, 1 inc, [4 sc, 1 inc] × 5, 2 sc. (36)
- R7: [5 sc, 1 inc] × 6. (42)
- R8–R10: 42 sc in each of 3 rounds. (42 each)
- R11: [5 sc, 1 dec] × 6. (36)
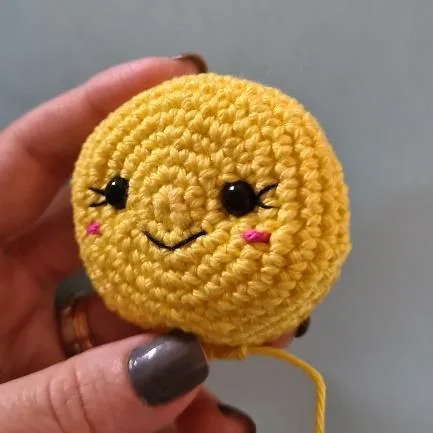
After R11, position two 6 mm safety eyes between R4 and R5. Embroider eyelashes before securing the eye backs; add the smile and embroidered cheeks.
- R12: 2 sc, 1 dec, [4 sc, 1 dec] × 5, 2 sc. (30)
- R13: [3 sc, 1 dec] × 6. (24)
Begin stuffing after R13 and continue as the opening narrows.
- R14: 1 sc, 1 dec, [2 sc, 1 dec] × 5, 1 sc. (18)
- R15: [1 sc, 1 dec] × 6. (12)
- R16: Dec × 6. (6)
Cut yarn, fasten off, and secure the remaining opening.
Make Five Heart-Shaped Pink Petals
Each petal begins with two separate rounded tops. Make two tops for each petal: 10 tops in total.
For each rounded top, with pink yarn, make an MR:
- Top R1: 6 sc in MR. (6)
- Top R2: Inc × 6. (12)
- Top R3: [1 sc, 1 inc] × 6. (18)
- Top R4–R6: 18 sc per round for 3 rounds. (18 each)
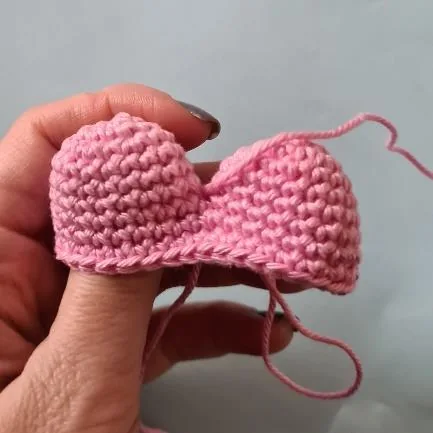
Cut the yarn on Top 1, leaving a 20 cm tail. Keep the yarn attached to Top 2. Place them side by side. With the working yarn from Top 2, begin crocheting into Top 1 and continue around Top 2.
- Joined Petal R1: 18 sc around Top 1, then 18 sc around Top 2. (36)
- Joined Petal R2–R3: 36 sc per round for 2 rounds. (36 each)
Use Top 1’s saved tail to stitch closed the small gap between the two tops.
- Joined Petal R4: [4 sc, 1 dec] × 6. (30)
- Joined Petal R5: 30 sc. (30)
- Joined Petal R6: [3 sc, 1 dec] × 6. (24)
- Joined Petal R7: 24 sc. (24)
- Joined Petal R8: [2 sc, 1 dec] × 6. (18)
- Joined Petal R9: 18 sc. (18)
Cut yarn, leaving a long sewing tail, and flatten the petal. Do not add stuffing—the source instructs flattening rather than filling these petals. Repeat until you have five complete petals. Pin the petals around the yellow bud, check the spacing, and sew each one securely to the bud.
Crochet the Green Flower Stalk (1)
With green yarn, make an MR:
- Stalk R1: 6 sc in MR. (6)
- Stalk R2–R25: 6 sc per round for 24 rounds. (6 each)
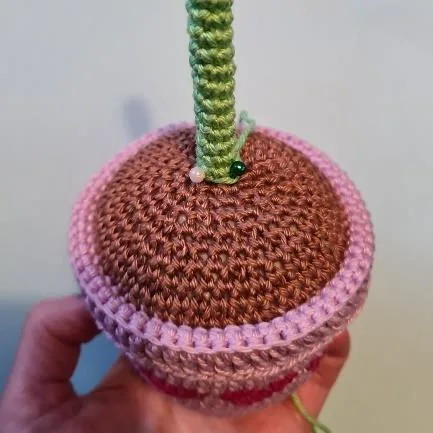
Cut yarn, leaving a long sewing tail. The original construction uses a wooden flower stick to keep the narrow stalk upright. Cut the stick to the length of the crocheted stalk plus 2 cm; slide it inside, leaving the extra length to extend into the pot. Insert it into the soil/pot and sew the crocheted stalk securely in position. Place the flower head on top and sew it securely; the original mentions white sewing thread for this attachment.
Make Two Green Leaves for the Flower
For each leaf, with green yarn, make an MR:
- Leaf R1: 6 sc in MR. (6)
- Leaf R2: 6 sc. (6)
- Leaf R3: Inc × 6. (12)
- Leaf R4: 12 sc. (12)
- Leaf R5: [1 sc, 1 inc] × 6. (18)
- Leaf R6–R10: 18 sc per round for 5 rounds. (18 each)
- Leaf R11: [1 sc, 1 dec] × 6. (12)
- Leaf R12: 12 sc. (12)
- Leaf R13: Dec × 6. (6)
- Leaf R14: 6 sc. (6)
Cut yarn, leave a long tail, flatten each leaf, and sew both leaves near the bottom of the stalk. Check that the wooden support and flower head remain stable before displaying.
Part 3: Crochet Heart Plant in a Pot
The heart plant has a large pink heart-shaped top, a smiling embroidered face, two small round cheeks, two green leaves, and a tiny five-petal flower. Prepare a second full pot with soil using Part 1.
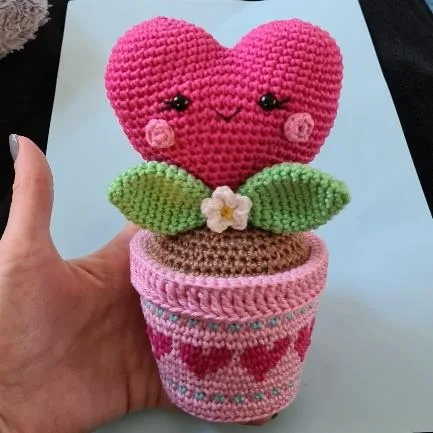
Make the Two Rounded Heart Tops
Make 2 identical pink tops, each starting with an MR:
- Top R1: 6 sc in MR. (6)
- Top R2: Inc × 6. (12)
- Top R3: [1 sc, 1 inc] × 6. (18)
- Top R4: 1 sc, 1 inc, [2 sc, 1 inc] × 5, 1 sc. (24)
- Top R5: [3 sc, 1 inc] × 6. (30)
- Top R6–R8: 30 sc in each of 3 rounds. (30 each)
Count-check detail: Top R4 ends with 1 sc, giving 24 stitches. One version of the original source text prints an extra ending sc; the supplied HookLoopPatterns PDF uses the count-consistent version shown here. Cut Top 1’s yarn, saving a 20 cm tail, and leave Top 2’s working yarn attached.
Join and Shape the Main Heart
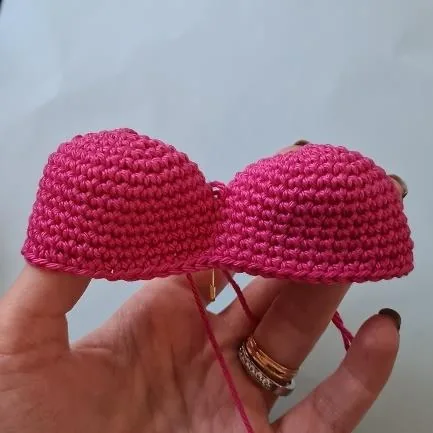
Hold the rounded tops side by side. Using the yarn attached to Top 2, begin in Top 1, work around it, and continue around Top 2.
- Heart Join R1: 30 sc around Top 1, then 30 sc around Top 2. (60)
- Heart Join R2–R6: 60 sc per round for 5 rounds. (60 each)
Use Top 1’s saved tail to sew closed the center gap between the tops.
- Heart R7: [8 sc, 1 dec] × 6. (54)
- Heart R8: 54 sc. (54)
- Heart R9: [7 sc, 1 dec] × 6. (48)
- Heart R10: 48 sc. (48)
- Heart R11: [6 sc, 1 dec] × 6. (42)
- Heart R12: 42 sc. (42)
- Heart R13: [5 sc, 1 dec] × 6. (36)
- Heart R14: 36 sc. (36)
At this stage, fit two 7 mm safety eyes between heart R6 and R8, 8 stitches apart. The original describes eye placement across that round range rather than naming one exact row. Embroider lashes before applying eye backs and add the mouth.
- Heart R15: [4 sc, 1 dec] × 6. (30)
- Heart R16: 30 sc. (30)
- Heart R17: [3 sc, 1 dec] × 6. (24)
- Heart R18: 24 sc. (24)
Start filling after R18; add more stuffing gradually during the final decrease rounds.
- Heart R19: [2 sc, 1 dec] × 6. (18)
- Heart R20: [1 sc, 1 dec] × 6. (12)
- Heart R21: Dec × 6. (6)
Cut yarn, leave a long sewing tail, and close the remaining opening. Numbering note: The earlier source skips the printed label R21 and calls the last decrease R22. The HookLoopPatterns PDF labels it R21, directly after R20; no extra crochet round is added.
Pin the stuffed heart above the brown soil and sew it securely to the prepared pot.
Crochet Two Pink Cheeks
Make 2 small circles:
- Cheek R1: With pink yarn, make an MR and work 6 sc into it. (6)
Slip stitch into the first sc, cut yarn with a long tail, and sew the circles onto the heart’s face.
Make Two Green Leaves for the Heart Plant
Make 2 leaves; each begins with a green MR:
- R1: 6 sc. (6)
- R2: 6 sc. (6)
- R3: Inc × 6. (12)
- R4: 12 sc. (12)
- R5: [1 sc, 1 inc] × 6. (18)
- R6–R10: 18 sc per round for 5 rounds. (18 each)
- R11: [1 sc, 1 dec] × 6. (12)
- R12: 12 sc. (12)
- R13: Dec × 6. (6)
- R14: 6 sc. (6)
Leave a long tail, flatten each leaf, and sew them below the pink heart.
Add the Tiny White-and-Yellow Flower (1)
- Mini Flower R1: With yellow yarn, make an MR and work 5 sc into it. (5)
- Mini Flower R2: Switch to white. In each of the five stitches from R1, work [1 sl st, 1 sc, 1 dc, 1 sc, 1 sl st] into that same stitch. This creates five petals.
Make the final sl st, tidy the ends, and leave a long tail for sewing. Attach the finished flower between the green leaves under the heart.
Part 4: Twin Cactus Crochet Plant in a Pot
The final design uses one larger and one smaller cactus, four pink cheeks total, three green heart-shaped thorns, and two tiny blue-petal flowers. Prepare the third shared pot and soil before attaching the pieces.
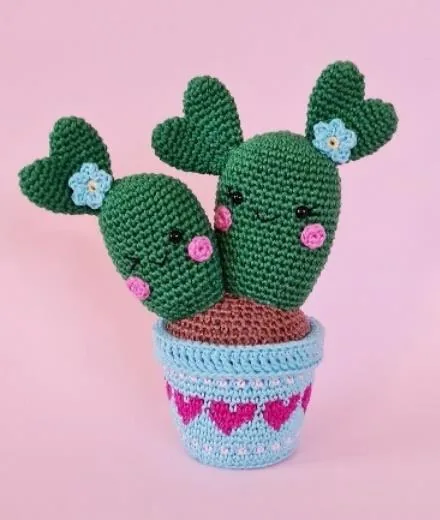
Crochet the Big Cactus (1)
With green yarn, make an MR:
- Big Cactus R1: 6 sc. (6)
- R2: Inc × 6. (12)
- R3: [1 sc, 1 inc] × 6. (18)
- R4: 1 sc, 1 inc, [2 sc, 1 inc] × 5, 1 sc. (24)
- R5: [3 sc, 1 inc] × 6. (30)
- R6: 2 sc, 1 inc, [4 sc, 1 inc] × 5, 2 sc. (36)
- R7–R23: 36 sc per round for 17 rounds. (36 each)
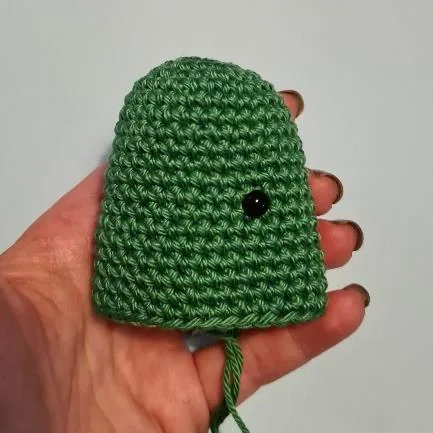
Insert two 6 mm safety eyes between R13 and R14, with 6 stitches between them. Embroider lashes before securing the eye backs; embroider a black mouth.
- R24: 2 sc, 1 dec, [4 sc, 1 dec] × 5, 2 sc. (30)
- R25: 30 sc. (30) Then make 1 sl st.
Cut yarn with a long sewing tail. Stuff the cactus and flatten it slightly as instructed. Pin it to one side of the soil-covered pot and sew in place. The bottom is sewn to the pot rather than being decreased shut.
Crochet the Small Cactus (1)
With green yarn, make an MR:
- Small Cactus R1: 6 sc. (6)
- R2: Inc × 6. (12)
- R3: [1 sc, 1 inc] × 6. (18)
- R4: 1 sc, 1 inc, [2 sc, 1 inc] × 5, 1 sc. (24)
- R5: [3 sc, 1 inc] × 6. (30)
- R6–R19: 30 sc per round for 14 rounds. (30 each)
Attach one 6 mm safety eye between R12 and R13; embroider the other eye as a wink, plus a black mouth.
- R20: [3 sc, 1 dec] × 6. (24)
- R21: 24 sc. (24) Then make 1 sl st.
Cut yarn with a long tail. Stuff and flatten slightly, then pin and sew the small cactus beside the larger cactus.
Make Four Small Pink Cheeks
Make two cheeks for each cactus—four in total:
- Cheek R1: With pink yarn, work 6 sc into an MR. (6)
Make 1 sl st in the first sc. Fasten off with a sewing tail and attach two cheeks to each cactus face.
Make Three Green Heart-Shaped Thorns
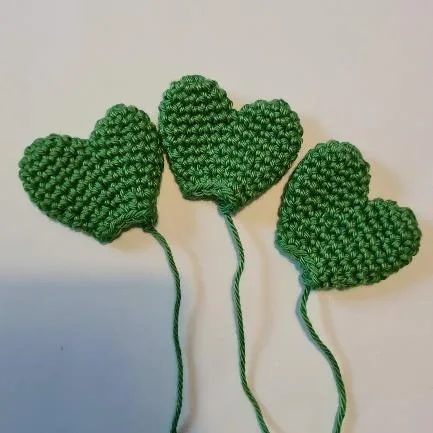
Each thorn has two rounded tops. Make two tops for each thorn—six tops total.
For each top, with green yarn, make an MR:
- Top R1: 6 sc. (6)
- Top R2: Inc × 6. (12)
- Top R3–R4: 12 sc in each of 2 rounds. (12 each)
Cut the yarn from Top 1, leaving a 20 cm tail. Keep the yarn attached to Top 2. Hold the tops together side by side; with yarn on Top 2, start working around Top 1.
- Thorn Join R1: 12 sc around Top 1 and 12 sc around Top 2. (24)
- Thorn Join R2–R3: 24 sc per round for 2 rounds. (24 each)
Sew the gap between the tops closed using the saved tail from Top 1.
- Thorn Join R4: [2 sc, 1 dec] × 6. (18)
- Thorn Join R5: 18 sc. (18)
- Thorn Join R6: [1 sc, 1 dec] × 6. (12)
- Thorn Join R7: 12 sc. (12)
Cut yarn with a long sewing tail, flatten, and attach each thorn to the cactus plants. Repeat for three thorns.
Make Two Tiny Blue-and-Yellow Flowers
Make 2 small flowers:
- Flower R1: With yellow yarn, work 5 sc into an MR. (5)
- Flower R2: Change to blue yarn. In each of the five R1 stitches, work [1 sl st, 1 sc, 1 dc, 1 sc, 1 sl st] into the same stitch. (5 petals)
Finish with 1 sl st. Weave in the unnecessary tails, but leave one long tail to sew each flower onto the cactus. Check their positions with the heart thorns before securing everything.
Finishing and Assembly Checklist
- Each plant: Confirm that its pot has the folded rim, cardboard base, brown soil insert, stuffing, and closed soil underside.
- Tall flower: Secure all five pink petals around the yellow bud; hide the wooden support inside the green stalk; sew stalk, head, and two flattened leaves in their specified positions.
- Heart plant: Close the two-top gap; finish the face and two cheeks; stuff the large heart and sew it to the pot; attach two leaves and one white-petal mini flower.
- Twin cactus: Sew the stuffed big and small cactus side by side; add two cheeks to each; distribute the three flattened heart thorns and attach the two blue-petal mini flowers.
- All three: Weave in exposed ends and gently adjust the shapes. The original images show the pots displayed upright, with the decorative colorwork visible on the front.
Helpful Crochet Tips
Check every increase before the sidewalls begin
The pot base must reach 48 stitches by R8. That number stays at 48 through R11 before expanding to 54 in R12 and 60 in R19. When you see an offset sequence with stitches on both sides of a bracketed repeat, count those edge stitches as part of the round.
Make the colorwork hearts easier to follow
Set out Color A and Color C separately, and track R14–R17 with a row counter. The pot keeps 54 stitches in each of these rounds, so a color change should not add or remove stitches. The supplemental tip here is to check color order after each full repeat, particularly in R14 and R15 where the sequence starts and ends with partial groups.
Keep the joins between two heart tops smooth
A gap between the rounded tops is expected until you sew it shut with the 20 cm tail. Count around both tops as a single circumference: 36 stitches for a pink daisy petal, 60 for the main heart, and 24 for a cactus thorn. If the join twists, reposition the two tops before the next round rather than forcing the join flat.
Stuff the right parts—and leave flattened pieces flat
The brown soil, yellow flower bud, large heart, and both cactus bodies receive stuffing. The petal, leaf, and thorn instructions call for flattening the pieces instead. Adding filling to a flat petal could change its silhouette and make sewing difficult.
Keep the tall flower upright
The skinny green stalk has only 6 stitches per round. The wooden flower stick is part of the original construction, not an optional change made to the pattern. Secure the stalk at the pot and the flower head; avoid leaving an exposed sharp tip.
Troubleshooting
| Problem | What to check |
|---|---|
| Pot base curls or has the wrong count | Confirm R4, R6, and R8’s staggered increases and finish R8 with 48 stitches. Tension can also affect flatness. |
| Heart motifs on the pot drift | Check where Color C starts in R14 and R15, and count 54 stitches in every heart-band round. |
| Soil insert seems to attach to the wrong edge | Use the back loops reserved by pot R24; these are different from the upper-rim edging loops. |
| Joined heart has a hole between its lobes | Use the saved 20 cm yarn tail to close the center gap after completing the specified joined rounds. |
| Petals stand out as bulky lumps | The source says to flatten petals, leaves, and thorns; check that you have not overstuffed these decorative parts. |
| Flower stalk bends | Check that the wooden stick was inserted through the crocheted tube and anchored into the pot as specified. |
| Cactus bodies shift in the pot | Pin both pieces first and sew their lower edges securely to the brown soil/pot before attaching thorns and flowers. |
Frequently Asked Questions
Is this a beginner crochet plant pattern?
It is approachable if you already know single crochet in the round, increases, decreases, and basic sewing. The repeated pot makes the three projects more familiar as you progress. Colorwork hearts, joining two lobe pieces, and the supported tall flower stalk may be new techniques for a first-time crocheter.
Do I have to use Scheepjes Catona yarn?
No. The original identifies Scheepjes Catona and a 2.50 mm hook, but also permits yarn and hook choices that work together. The finished size will change if you choose a different yarn or tension. The source does not give a gauge or yardage to guarantee exact substitution measurements.
Can I make just one of the three plants?
Yes. Make one shared pot and soil insert from Part 1, then complete just the tall flower, heart plant, or twin cactus. You do not have to crochet the other two designs.
Why does the heart plant use 7 mm eyes while the others use 6 mm?
That is how the two supplied patterns specify their features: 7 mm eyes on the large heart, 6 mm eyes on the yellow flower bud, and 6 mm eyes on the cacti. Follow each component’s placement directions or use embroidery for a decorative version without plastic eyes.
Should the pink petals and cactus thorns be stuffed?
The pattern directs you to flatten these pieces and sew them on. It only explicitly instructs stuffing for the pot/soil and the larger three-dimensional flower, heart, and cactus pieces.
Can the finished crochet pots be washed?
The pattern uses a cardboard pot insert, and the tall flower contains wood. Those materials are not designed for machine laundering or soaking. Treat the finished arrangements as decorative objects; careful surface dusting is a safer general care approach.
A Handmade Garden of Crochet Plants
Did You Make This Crochet Pattern? Leave a Review!
If you tried this pattern, please rate it and share your honest experience to help other crocheters. Reviews are moderated before publication.
Crocheter Reviews
There are no reviews yet. Be the first one to write one.
These three crochet plants use the same base but offer different construction skills: neat colorwork on the pot, joined heart-shaped pieces, a supported flower stalk, and small embroidered faces. Save the pattern for a full set or begin with just one pot and one plant. For another free floral project, try the crochet daisy flower applique; for another cheerful piece of crochet decor, see the free shooting star crochet pattern.